Discover
What we do
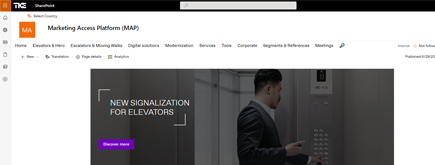
TKE SharePoint rebranding
TKE, a global elevator leader, consulted with NIFTIT to overhaul their SharePoint site for the Asia Pacific team. Enhanced search, mobile usability, and multilingual interface ignited innovation.
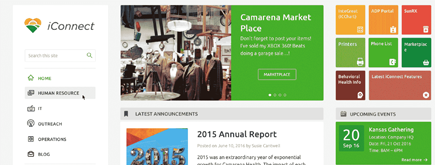
Camarena Health
NIFTIT's expertise in advanced UI/UX design combined with the functionality of Microsoft 365 transformed Camarena Health's digital landscape, driving efficiency and engagement.
The New York Metropolitan Transportation Council (NYMTC)
Discover how NIFTIT improved data access and enhanced collaboration for NYMTC by leveraging SharePoint, optimizing data connections, and orchestrating business automation workflows.
NIFTIT LLC
85 Delancey St, 2nd Floor, New York, NY 10002, USA 1-848-272-0977
Add an Existing Site Column to SharePoint List
By
 Khoa Q.
Published 2 years ago
~3 minute read

Adding columns in SharePoint allows you to group, categorize, and track information in a list or library. Types of columns include:
- a single line of text
- a drop-down list of options
- a number calculated from other columns
- a column that lets you select the name of a user
The below tutorial will guide you on how to add an existing site column to a SharePoint Online/2019 list or library.
Step 1: Move to the list or library in which you want to create a column.
Step 2: If the page does not show the name of your list or library, select Settings button > Site Contents, then choose your list name or library name.
Step 3: Go to the Settings button again, then select List settings or Library settings from the dropdown.
Step 4: You will be taken to the Add Columns from Site Columns page. In the Select Columns section, pick the group of site columns you want to choose from in the Select site columns from dropdown.
When you pick a column group from the list, the available site columns will appear in the Available site columns box.
NOTE: The Available site columns list defaults to All Groups, but you can limit the number of fields by choosing other groups in Select site columns from that might include what you’re searching for, such as Core Document Columns or Custom Columns.
Step 5: Select the columns you want to add to the list, then click Add. The columns appear in the Columns to add box.
To add the column to the default view, which users on your site can automatically see when they first open a list or library, make sure that you click Add to default view.
Some lists (like the Tasks list) also have the option to Add to all content types, which is a default setup. When you plan to add the column to all content types, be sure that Add to all content types stays selected.
Step 6: The Options section offers additional settings depending on the type of list or library chosen, so be sure to take a look at the afforded selections.
Step 7: When the settings are complete, select OK to save.
We hope this post is helpful to you! If you have any questions or issues with SharePoint, feel free to leave a comment and we will do our best to support.
Here at NIFTIT, we can handle projects of any size and difficulty; from Office 365 to SharePoint solutions, we do it all! We are happy to share our digital offerings with you, so reach out here to learn more about how we can best support you.